Probaj ovako mada su ovi tutorijali pisani jako davno i za enigmu 1.....
Snimanje sa Dreambox-a na hard disk uz pomoc CIFS
UVOD :
Za sve one koji traze drugi nacin, pored NFS-a, da snimaju omiljene programe na hard disk na svome kompu u lokalnom netwerku za to mogu koristiti CIFS. CIFS je u principu SMB kiljent uz pomoc kojega spajamo svoj Dreambox linux system na windows share. U medjuvremenu skoro svi image imaju opciju CIFS mounting.
Ovo uputstvo sastoji se iz sljedecih stavki :
1. Pravljenje Acoutant-a
2. Dijeljenje neke mape u vasem racunaru
3. Konfiguracija Dreambox-a
Pravljenje Acoutant-a
Ove instrukcije su bazirane na upotrebi windows xp pro operativnog sustava...
Idete u Control Panel i nadjete u njemu Computer Management
u njemu sa lijeve strane kliknite sa desnim dugmetom na misu na Users i izaberite opciju New User. Ukucajte vase User Name i dva puta password, skinite kvacicu sa opcije "User must change password..." te poslije toga stavite kvacicu na opciju "Password newer expries". Kliknete na Create i sada ste napravili novi user koji ce vam biti dalje potreban. Bitno je zapamtiti User name i password koji ste ovde unjeli jer cete te podatke poslije upisati u Dreamox.
 2. Dijeljenje neke mape u vasem racunaru
Idete u Control Panel i nadjite Folders Options, pod View medju opcijama koje imate izbrisite kvacicu na "Use simple file sharing (Recomanded)"
Kada ste to uradili kliknite na Apply da to pohranite...

Sada nam je ostalo da na nasem kompu napravimo mapu koju cemo u ovom slucaju recimo nazvati Dreambox u njoj cemo napraviti novu mapu kojoj cemo dati ime Movies. Kada smo to uradili vracamo se na prvu mapu Dreambox kliknemo desnim dugmetom na tu mapi i izaberemo opciju Proporties. Idete na Sharing kliknete na Share this folder. Sada kliknete na Permmisions i kliknete na Add i ukucajte vase User name koje smo gore u prvoj opciji vec napravili. Kliknite na OK i sada cete vidjeti gore da vam je napravljen novi acoutant. Klinite na njega i cekirajte (stavite kvacice) na sve opcije kod njega Full Control...... Ostaje nam da jos dva puta kliknemo na OK i zavrsili smo i taj posao. Nasa mapa se sada dijeli u netverku pod potpunom kontrolom od strane Usera Dreambox.
 3. Konfiguracija Dreambox-a
Sada idemo na Dreambox uzmemo daljinac idemo na menu - Expert menu - Communication menu
Klikni na plavo dugme da udjes na Mounts menu.
Ukucaj sa daljincem Ip od vaseg kompa i ostale pofatke koji su vam potrebni za to mozete koristiti sliku dole.
Klikni na Automount ukoliko zelite da vam prepozna hard disk kod svakog restarta Dreambox-a.

Da biste provjerili da je sve proteklo kako treba kliknite na zeleno dugme na daljinskom "Mount" te ukoliko je sve uradjeno kako treba trebalo bi da dobijete sljedecu poruku :

I to bi bilo to sada znaci mozete poceti snimati sa vaseg dreamboxa na HDD na vasem kompu.
#########################################################################
#########################################################################
Streaming from the PC to the BOX HOW-TO
Streaming from the PC to the BOX (i.e. Dreambox)
So you are using Dreambox for quite some time now and you are happily sharing. You know your Box can do much more like streaming to your PC or even the internet and you probably heard that you can play your local media files stored on the PC on your TV via the Dreambox. ¬ But all that is too complicated for you right now-¦ maybe some other time-¦
Well ¬ No it is not complicated and if you have the right manual configuring your box is a matter of minutes. I don`t know if this is the right place to post this, but I know I looked here when I was seeking information.
Now I will share my findings with you in a form of simple step-by-step manual:
To configure the Dreambox to watch media files from your PC you will need an Add-on on the dbox. Fortunately this is easy job:
Step 1.
From the box you go to the Addons (blue panel -> download (Gemini-Server)->plugins->VLCF-Final RC2 ¬or whatever if by the time you read this there is a new version)
Step 2.
Now you have to download a piece of software for the PC ¬ a great one by the way. Go to http://www.videolan.org/ and download the latest version (VideoLan 0.86c)
Step 3.
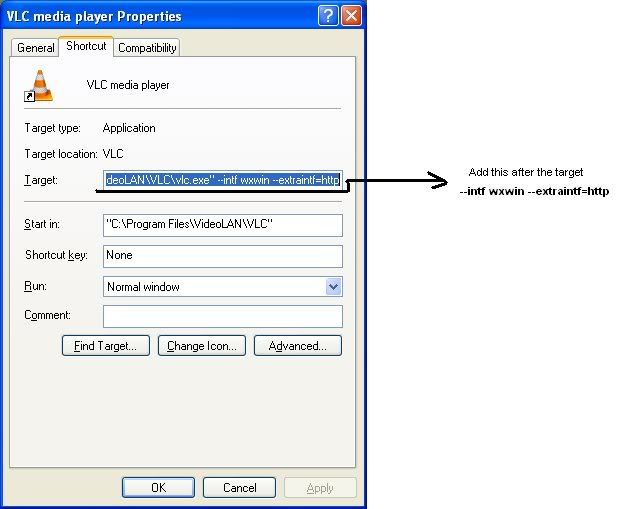
Install the Videolan software; you may want to include the Mozilla plug-in during the installation. Then there will be a shortcut on your desktop:
Click right mouse button on it , click -Properties-
In the Properties window under the tab -Shortcut- ¬ add --intf wxwin --extraintf=http after the target location. For example: "C:\Program Files\VideoLAN\VLC\vlc.exe" --intf wxwin --extraintf=http
 Step 4.
Now its time to configure the part on the dreambox. This will happen by modifying an .XML file.
Step 4.
Now its time to configure the part on the dreambox. This will happen by modifying an .XML file.
Use FTP client to access your box. You can use IE if you want (on IE7 after accessing your ftp site - press -Alt- then View -> Open FTP Site in Window Explorer)
Find vlcf_original.xml - it is located in /var/tuxbox/config/
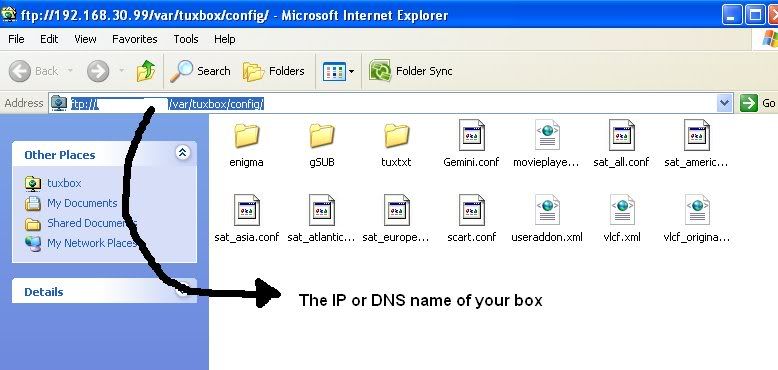 Copy the file in your PC. Now you can edit it. Open the file with WordPad.
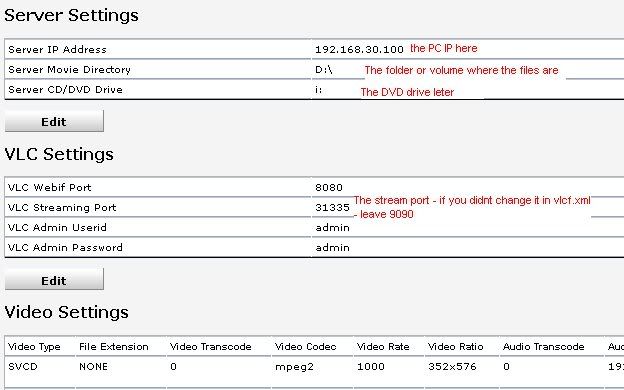
Inside you will see a lot of thing. This plugin allows you to configure 4 servers. We will limit this manual to just one. So look for set1
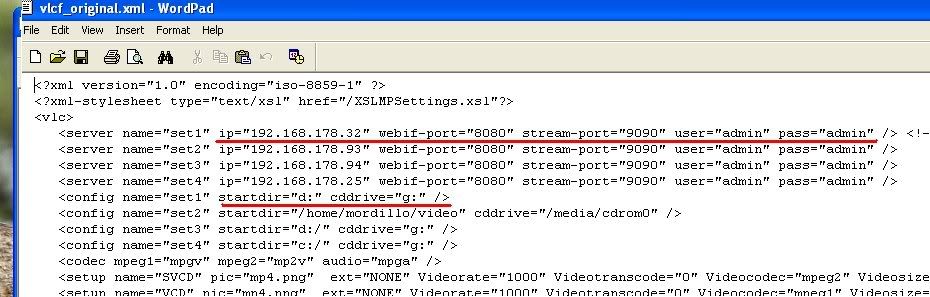 The values are:
* IP =The IP address of your PC
* Stream-port = by default 9090 some suggest changing to 1335 (not sure this is necessary).
** User = If you didnt mess with the VLC configuration, leave this as it is
** Pass = same as the above
Then you have to tell vlcf where you files and DVD drive are.
startdir="d:" cddrive="g:"
startdir ¬ is the place where the media files are. You have to share this folder (volume) in the PC
Now that your changes are set, you need to Save As.. this file as ¬ vlcf.xml ¬ or if you want click save and then rename the vlcf_original.xml to vlcf.xml (erase the -original- part).
Now upload back that vlcf.xml from where it came from ¬ copy-paste to /var/tuxbox/config/ on the box.
You are ready. Now you should be able to use the plugin. I found some additional steps described, I dont really know what deferens they make but I made them and as far as I can tell ¬ they dont do any harm.
Step 5.
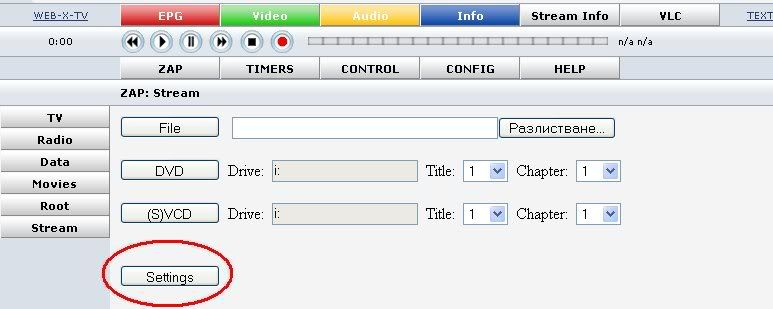
 Now you are really ready. Start VLC on the PC using the shortcut.
With the remote of the box, pres yellow button (usually). You will see the VLC-Frontend plugin. Select it. If you did all right, on the TV you will see a list of files from the -startdir- on your PC ¬ select-enjoy
Izvor : dream-sat.info


 .
.


